|
|
|
This page last updated on 01/26/2019. Copyright © 2001-2019 by Russ Meyer |
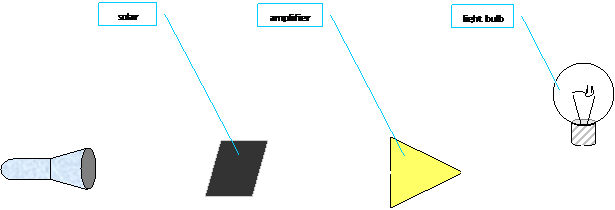
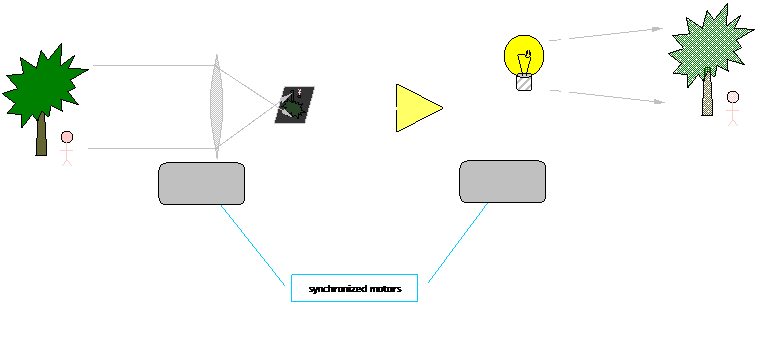
The main electronic components are a silicon solar cell, an amplifier, and an incandescent light bulb. The solar cell generates a current when illuminated with light. The more light, the more current. Unfortunately, a single solar cell cannot generate enough power to drive much of anything (like a light bulb). To do that, the weak current from the solar cell needs to be amplified with...you guessed it, an amplifier! If the amplifier is set up right, it can be connected to a small light bulb. When no light is striking the solar cell, no signal is applied to the amplifier, so the amplifier output is near zero and the light bulb is dark. When light strikes the solar cell, a signal is applied to the amplifier, which outputs a significant current, causing the light bulb to glow.
No Light Striking Solar Cell - Lamp Remains Dark
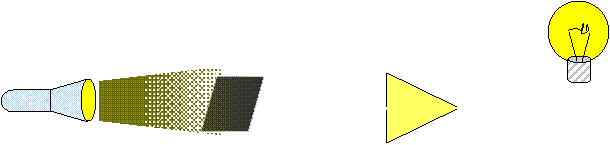
Light Striking Solar Cell - Lamp Turns On Now imagine a lens focusing an image of a scene onto the solar cell. Because light from the entire scene is striking the solar cell, the output current of the cell will be proportional to the average brightness of the scene. The light bulb will turn on part way because the solar cell is neither fully dark nor fully illuminated; it is only partly illuminated.
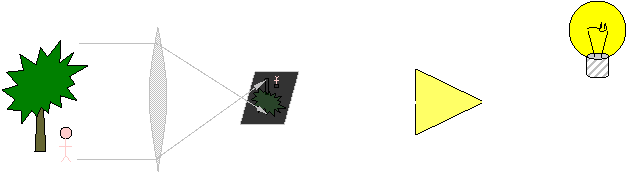
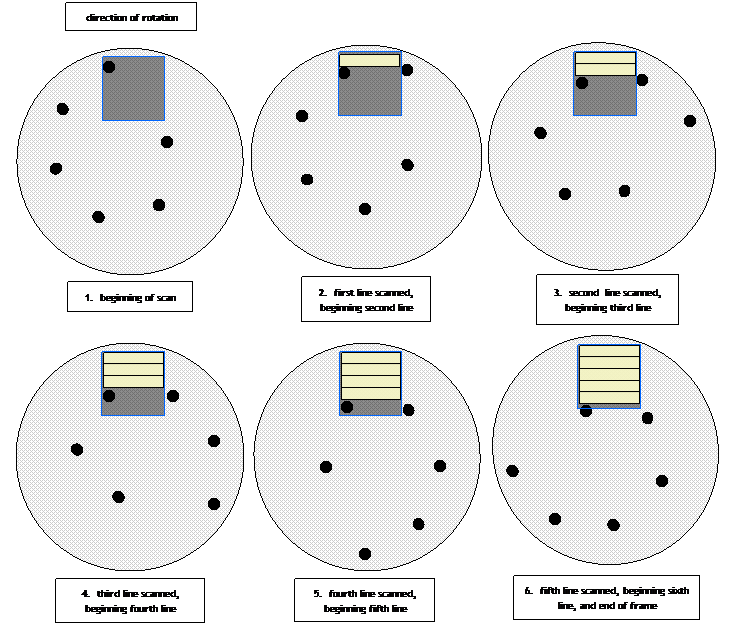
If only the light from a tiny segment of the scene were allowed to strike the solar cell, the lamp would glow only as bright as that tiny segment. Imagine holding an opaque card in front of the lens. Say the card has a little hole in it. As you move the card around, the only part of the scene visible to the solar cell is that part that can be seen through the little hole. It's like the solar cell is looking at the scene through a little key-hole. If you move the card around fast enough and make sure you move the hole around so that it passes over the whole lens, the solar cell will successively see tiny bits of the whole scene. At every instant, no matter where the hole is, the light bulb is faithfully reproducing the brightness of the part of the scene visible to the solar cell. The light bulb appears to flicker as the part of the scene visible to the solar cell is now bright, now dim, now sort of bright, now pitch black, etc. If you looked at the light bulb through another opaque card with a hole in it, and that hole was moving in exactly the same way the other card was moving, you would see bright spots where there were bright spots in the original scene and dark spots where there were dark spots. If the cards were moving fast enough, because of the persistence of your eye, these bright and dark spots would seem to all be simultaneously visible, and you would in fact, see an image of the original scene. The Nipkow disk is just an opaque circular card with a series of holes in it. The disk is mounted on a rotating shaft in front of the lens. As the disk rotates, a succession of holes sweep past the solar cell, in effect, causing the scene to be scanned line by line. Here's how it works; the dark square represents the picture area of the scene as projected by the lens onto the solar cell.
A pair of these spinning disks are used. One is at the transmitter and another at the receiver. The disks must be synchronized so that as the first hole passes across the scene at the transmitter, the corresponding hole on the second disk passes in front of the lamp at the receiver. By the time summer came, I felt I understood the whole apparatus well enough to begin construction. I worked on it for several weeks. To simplify the set-up, I built the thing with one motor driving two separate shafts through a chain. By doing this, I could be certain the two disks would always be in sync. I played with various combinations of lenses, disks, and solar cells. I finally got to the point where I could hold my finger in front of the transmitter lens and see a corresponding dark line appear at the receiver. That was my all-time crowning achievement. The device had a lot of electronic problems, and I was having trouble solving them. The main problem was contrast ratio. The combination of low amplifier gain and sluggish response of the incandescent bulb resulted in really bad contrast. I thought the solar cell would have a slow response time, but that was not the case. It could easily keep up with changes in light intensity beyond 60 Hz. Plenty for the television system I was trying to build. That dang light bulb was definitely the biggest problem. It could only turn on and off so fast. The response time was so slow that it was almost unusable. In the 1920s, they had quickly migrated to neon filled tubes instead of incandescent lamps because the neon tubes reacted much more quickly to changes in voltage. I could have tried that too, but would have had to build a high voltage vacuum tube amplifier to drive it. I just didn't have the money or technical expertise to cope with that. In later years, I came up with alternate electronic systems which would have performed much better. I might try building one of these things again. If I do, I'll probably substitute a phototransistor at the focal point of the transmitter lens. At the receiving end, I'll use a high intensity LED at the focal point of another lens. I could also use an array of LEDs all driven by a common circuit and arranged in a square pattern with a small piece of glazed glass over them. This would produce a square light emitting wafer with a very fast response time. The electronics in between could be just TTL logic gates that are either on or off depending on how much light was striking the phototransistor. I wouldn't have any grey scales, but I'd have plenty of contrast! As an alternative to that, I could use the phototransistor to modulate the duty cycle of the LED array. That would produce a modicum of grey scales. Another refinement was providing some means of electrically synchronizing the disks so that they wouldn't have to be mechanically coupled. I succeeded in designing a circuit to do that, but haven't built a prototype of it yet. It later occurred to me that I could substitute almost any kind of detector for the phototransistor, so long as it had a fairly fast response time. For example, if I put an infrared phototransistor in the transmitter, I would be able to image scenes in infrared. If I made the disk out of lead and substituted a Geiger tube for the phototransistor, I could image the radiation field in a room. There are a lot of possibilities. I designed a compact hand-held version of a transmitter/receiver pair for just this kind of experiment. I'd really like to try building it someday. Somewhere around here I have some photos of the original television system I built. If I ever find them, I'll include a picture of the setup. After writing this article, I searched the web looking for information about Paul Nipkow and narrowband television systems. I discovered a little underground of television system homebuilders called the Experimental Television Society. Most of the enthusiasts are building mechanically scanned systems using Nipkow disks. |
 It
was the spring of 1977 and I was in 8th grade. My Dad brought
home a pile of old engineering magazines from work. Among them was a
copy of "Electronic Design." I carefully read it cover-to-cover and
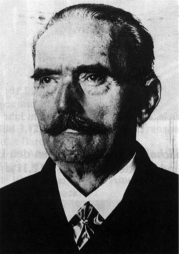
discovered an article about the German inventor
It
was the spring of 1977 and I was in 8th grade. My Dad brought
home a pile of old engineering magazines from work. Among them was a
copy of "Electronic Design." I carefully read it cover-to-cover and
discovered an article about the German inventor