|
|
|
This page last updated on 01/26/2019. Copyright © 2001-2019 by Russ Meyer |
We
went out to the airport, readied the plane, and launched. The air was hot
and bumpy. Despite the Dramamine, Serena lost it just After flying, we stopped by a local hardware store near home and picked up the following items:
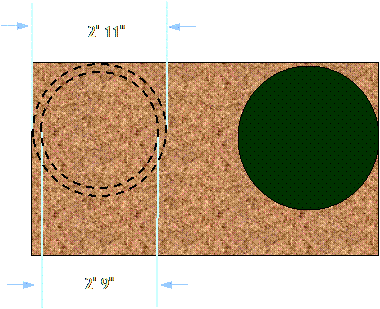
The only other thing needed was plastic sheeting, but I already had some at home. The Mark I Hovercraft The basic idea was to use the board as the body of the hovercraft. The leaf blower would be bolted on top with PVC pipe ducting the air through the board so it would blow underneath. The wheels would be bolted under the hovercraft to act as landing gear. If the blower stopped for some reason, I didn't want the machine to lurch to a stop and throw the rider; the landing gear would allow a gentle rolling stop. The hovercraft needed a skirt; it's a flexible sidewall that hangs down under the craft close to the ground. It traps a cushion of air for the machine to ride on. The skirt is the most important part of a hovercraft and has to be built right. I figured we'd probably go through a number of skirt variations before finding one that worked. My first thought was to just tape some plastic sheeting around the circumference of the hovercraft, reinforce it with duct tape, and put a drawstring at the bottom. The drawstring would prevent the bottom of the skirt from flairing out when the air cushion was pressurized. Now for the dimensions of the machine. I figured the leaf blower could easily generate ½ PSI of pressure. The total weight of the machine and rider (like me) was, at most, 300 pounds. That meant, the machine needed to have a pressurized cushion area of at least 600 square inches (300 lbs ÷ ½ PSI). If the machine were circular, it would need to be to 28 inches (~2.5 feet) in diameter (diameter = 2 * SQRT(600 square inches ÷ π)). Because my board was 4 feet wide, I made it easy on myself and built the hovercraft as a four foot square with rounded corners. That gave me about 2000 square inches of area; more than enough to lift 300 pounds. Here's a photo gallery showing the first prototype under construction:
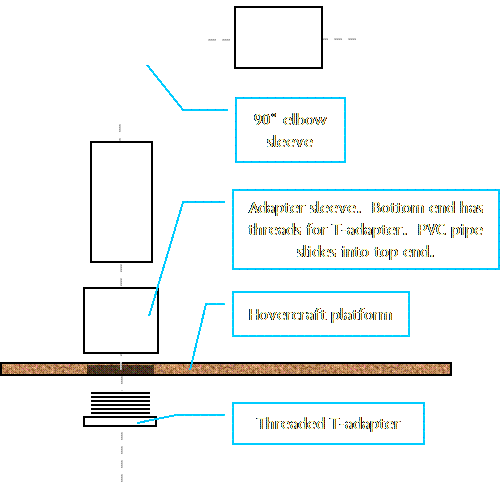
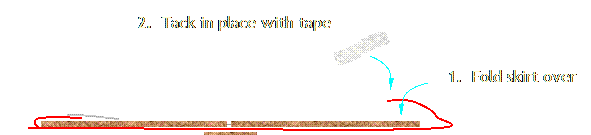
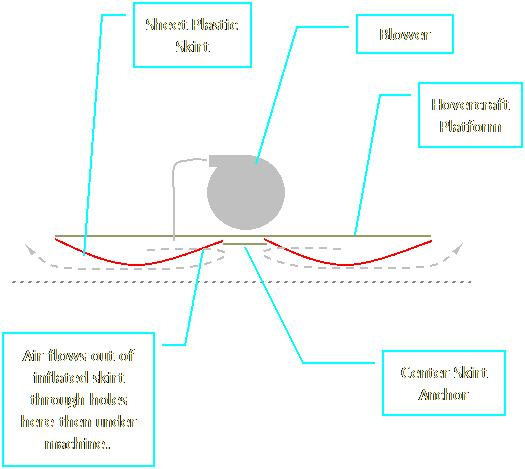
After five hours of construction, we were ready to give it a try. I started the blower and revved the engine. The machine didn't rise an inch; and that was with no one on board! The machine couldn't even lift it's own empty weight...about 30 pounds. Heck, I couldn't even get the skirt pressurized...it just sat there limp and lifeless. Well, that was a total failure! I couldn't figure out what was wrong. Everything was working right, but the machine wouldn't rise. Finally, it occurred to me that perhaps the blower didn't have the ability to deliver a great enough volume of air. The skirt had a total length of about 15 feet around the circumference of the machine. That was a lot of area for the air to escape. The air was escaping under the lower edge of the skirt faster than the blower could pump. The blower needed to pump more air into the cavity than could leak out around the edges, otherwise the skirt would not pressurize. Hmmm...guess I learned something about hovercraft design. It wasn't all about pressure differential. Air volume and outlet area around the circumference of the skirt were also important. To test this theory of skirt outlet area, I got a small trash can, about 2 feet in diameter, and placed the hovercraft on top of it. With the air duct outlet over the center of the trash can and the engine revved, the craft seemed to rise about ⅛ inch. That indicated the theory was right. With a reduced outlet area, the blower was able to develop some pressure inside the trashcan and lift the machine. I needed to redesign the machine to better match the volume the blower could deliver; that meant a significant reduction in linear feet of skirt. The Mark II Hovercraft The machine had to be scaled down to minimize skirt outlet area. At it's smallest, it would need space for the blower, some air duct plumbing, and room for someone's feet so a person could stand on it. More like a hoverboard than a hovercraft. It would probably be unstable and very difficult or even downright dangerous to ride. Still, I thought I might try it as an interim experiment. If the thing flew and held the weight of a person, I could scale it up. I thought about it for a while and decide to ditch the plan. The experiment would be a detour, burning time and attention span. If I didn't get this thing working soon, the kids and I would lose interest and shelve the project. Too much foolin' around would kill the project. No, I had to make another direct assault on creating a rideable hovercraft. My whole approach to skirt design had been bothering me. I was trying to use a skirt hung like a vertical curtain. If the hovercraft was cruising along and the leading edge of the skirt snagged on something, it could be pulled under the hovercraft. That might make the skirt collapse as the pressurized air rushed out the resulting breach. A sudden skirt collapse could be a problem. It might make the machine come to a sudden stop and throw the rider. Also, the drawstring at the bottom of the skirt was ideal for snagging ground obstacles. It could snag on something and peel the whole skirt off the machine as it was moving. Yet another catastrophic failure mode. Nope...my skirt design was really lacking. I needed to come up with something better. In an attempt to pick up some tips, I Googled "hovercraft leaf blower" and found a handful of relevant web pages. It turns out that most guys use a radically different skirt design. The skirt is simply a sheet of plastic stretched across the underside of the machine; anchored in the middle and along the edges. The blower exhausts into the space between the skirt and the hovercraft body, inflating the skirt like a balloon. When inflated, the skirt looks like a bagel cut in half. A series of holes are cut in the skirt near the middle to allow air to escape. The air rushes out of these holes and flows between the skirt and the ground, lifting the machine. Here's what it looks like in cross section:
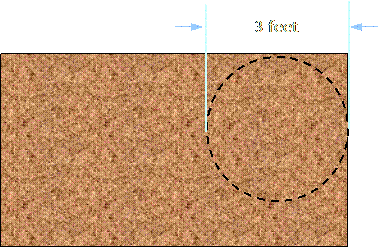
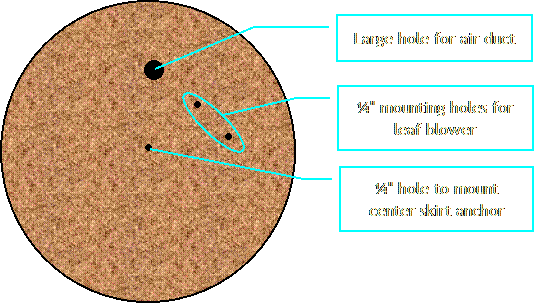
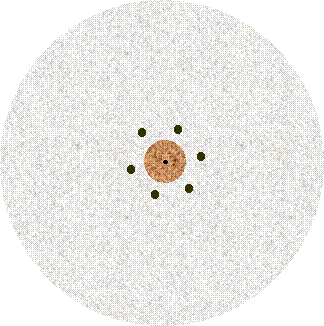
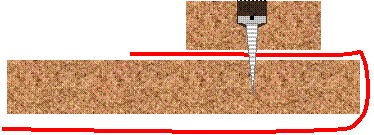
I decided to rework my hovercraft to use this skirt design. The landing gear and old skirt were removed and discarded. I then hacked the hovercraft body down to a 3 foot diameter circle. A center skirt anchor was made out of the bottom of an old Wisk liquid detergent container and a ¼ carriage bolt. A shower curtain was pressed into service as a skirt and mounted in place with duct tape. Finally, I cut six 1½ inch holes spaced evenly around the center anchor for an air outlet. Here are a couple of photos showing some design details:
I started the blower and revved the engine. The skirt inflated and the machine lifted off the ground! It floated almost frictionless on a cushion of air. Serena sat on the machine and it lifted her just fine! I pushed her back and forth across the garage a couple of times. The hovercraft worked! Serena and I ran in and got the rest of the kids. Katie and Annette gave it a try, but Nicky was afraid of the engine noise and opted out. Throughout these first few "flights," the plastic skirt took a beating. It tore very easily and I had to repair it with duct tape. Finally, when I tried to get on the machine myself, the plastic sheeting blew out...actually ripped in two. That ended our test flights. However, I was determined to find an improved skirt material and repair the machine. The Mark III Hovercraft The next day, Serena and I trekked to the hardware store and bought a 10 mil, fiber reinforced, contractor's tarp. It seemed very tough; perfect skirt material. I decided that along with replacing the skirt, I would rebuild a few components that had just been slapped together in the previous model. The following improvements were made:
Here are a couple of photos highlighting the design changes:
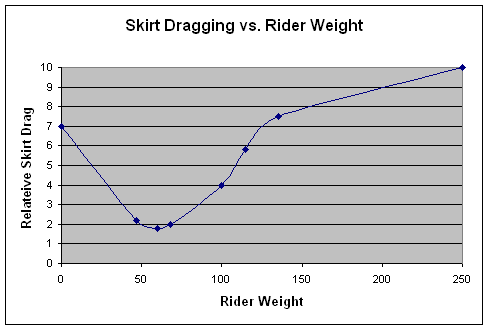
After test flying the Mark III a few times, it became clear that the larger vent holes were almost perfectly sized. Any smaller and the skirt over-inflates. Any larger and the skirt would probably have some difficulty inflating. The circumferential skirt retaining ring did a magnificent job sealing the skirt and holding it in place. Finally, the heavy tarp held up well to the beating. In fact, as long as the hovercraft is operated over very smooth surfaces, like tennis courts, the skirt should last a long time. Bumpy concrete causes significant scuffing, leading to terminal abrasion. Scattered rocks can critically damage the skirt. The hovercraft appears to float less than ⅛ inch above the surface. A variety of people, weighing from 45 to 250 pounds have ridden the hovercraft. In its present configuration, it seems to have a sweet spot with respect to load carrying capacity. Skirt dragging is minimized with 50 to 80 pound riders. In fact, the skirt hardly ever touches the ground with riders of about 65 pounds. Weights outside this range increase skirt drag. The machine seems able to comfortably carry a maximum of 115 pounds. Below is a graph showing how skirt dragging depends on rider weight. Skirt abrasion, and therefore skirt life, is directly related to skirt dragging.
More skirt scuffing and dragging is expected with heavier riders, but I was surprised that dragging increased for light riders. I'm not sure why this happens. Perhaps the inflated skirt takes on an inefficient shape when there isn't much load on it. In theory, a larger diameter craft should have better weight carrying capacity. (I eventually tried a larger diameter; see the epilogue below.) Other Ideas If I get around to it, there are a number of things I'd like to try:
The Mark III in Movie Form The first garage tests:
Parking lot fun:
Build Your Own Mark III Why don't you try building your own hovercraft? It's not hard; I think I could build one from scratch in 3-5 hours, now that I know what to do. Below are some instructions you can follow to make one for yourself. Be advised...the instructions are not super detailed because I'm just not up to writing a humongous assembly procedure. You'll just have to fill in the little details yourself. However, all the dimensions, components, etc. are not real fussy. If you get it put together anywhere even close to what I describe, it should work just fine. It's OK to make-up some stuff as you go along...heck, I built mine almost totally by guessing!
If you make a hovercraft using my plans, please let me know. I'd love to hear about it. Click here to send me E-mail.
Epilogue - The Mark IV Hovercraft The kids had a lot of fun running the Mark III around, but I was really too heavy for it. I wanted to try to increase it's load carrying capacity so I could experience the fully glory of hovercraft piloting. I reasoned that the leaf blower appeared to have more than adequate volume, but at low pressure. If I increased the surface area of the hovercraft, I should be able to reduce the load per unit area and make better use of the low pressure air cushion. I rebuilt the Mark III, increasing hovercraft platform diameter from 3 feet to 4 feet. This almost doubled the platform area from 28 ft² to 50 ft². In all other respects, the Mark III and Mark IV were identical. The net result was a big improvement in load carrying capacity. The Mark IV seemed immune to the skirt dragging that plagued the Mark III. It carried me with ease and I got to have my share of hovercraft piloting. I experimented with one other improvement; changing the shape of the skirt. I did this by leaving a lot of slack in the skirt when I screwed it in place with the retaining ring. This had the effect of making the skirt billow out more; it shaped it to look more like a bagel cut in half. That shape didn't work at all. It was horribly inefficient. Ultimately, I came back to the shape I had used in the beginning, by just pulling the skirt taunt when screwing it in place. Here is a video of the Mark IV in operation. Jane is pulling Nick around on the end of a rope. Nick weighs about 50 pounds. Swinging the kids around in a big circle with the rope became the favorite hovercraft pastime. Jane pulling Nick on the Mark IV. | |||||||||||||||||||||||||||||||||||||||||||||||||||
.JPG) as we were landing
and puked all over the floorboards. She recovered pretty quickly so we
headed to a nearby Chili's for lunch. Over lunch we talked about what to
do when we got back from flying, but couldn't come up with any good ideas.
On the way back to the airport, we stopped by a hardware store. We were
walking the aisles looking at stuff when a leaf blower caught my eye. I
picked it up and told Serena that I sure needed one. We talked about leaf
blowers a bit and then an idea hit me. I had heard you could make a
hovercraft out of these things and told Serena we should while away the rest of
the day trying to build one. She was delighted, so that became the plan.
We thought we'd pick up the necessary materials when we got back from flying.
The project would occupy us the rest of the evening and keep us well away from
all the virus infested natives.
as we were landing
and puked all over the floorboards. She recovered pretty quickly so we
headed to a nearby Chili's for lunch. Over lunch we talked about what to
do when we got back from flying, but couldn't come up with any good ideas.
On the way back to the airport, we stopped by a hardware store. We were
walking the aisles looking at stuff when a leaf blower caught my eye. I
picked it up and told Serena that I sure needed one. We talked about leaf
blowers a bit and then an idea hit me. I had heard you could make a
hovercraft out of these things and told Serena we should while away the rest of
the day trying to build one. She was delighted, so that became the plan.
We thought we'd pick up the necessary materials when we got back from flying.
The project would occupy us the rest of the evening and keep us well away from
all the virus infested natives..JPG)
.JPG)
.JPG)
.JPG)
.JPG)
.jpg)
.JPG)
.JPG)
.JPG)
.jpg)
.JPG)